Showing posts with label gluten free. Show all posts

Friday, September 12, 2014

Post Workout Tropical Smoothie


In honor of my tropical vaca I decided to post one of my favorite snacks that always makes me feel like I'm relaxing on a beach: a mango banana coconut smoothie. Whenever the weather is warmer I always start craving smoothies and this summer was no exception. I keep my smoothies low cal by opting for soy or almond milk over low fat yogurt but if I want a bit more protein after a tough workout I add a little bit of greek yogurt for some extra substance. My favorite fruit is by far mango and I love all things coconut so this smoothie tasts more like a tropical treat than a healthy recovery snack!

You'll need:
A ripened banana (the riper the banana the sweeter they are)
Cut up mango
Ice
Soy Milk
Coconut Chobani Greek yogurt

How to:
Add the ice into your blender first, followed by the mango and banana. Add in a couple of spoonfulls of yogurt. I use about half of a Chobani coconut yogurt but if your looking for a heartier smoothie you can use the whole container. Pour in a bit of soy milk, blend, and slurp! 

Thursday, September 4, 2014

Kale Chips


My personal weakness is potato chips. I could easily eat a giant bag in one sitting, which is why I generally avoid keeping them in my apartment. These kale chips have the same satisfying crunch and saltiness as my favorite junk food, but are high in calcium, vitamin C, vitamin K, and vitamin A. These "chips" are truly addicting and there's no guilt involved in eating a whole bowl!

You'll Need:
Kale leaves
Olive oil
Salt
Garlic powder
Onion powder
Baking sheet

How To: 

Set your oven to 350 degrees. First step is to wash and cut your kale, you don't want any of the stalk attached to the leaves. Lightly grease your baking sheet and dust with salt, garlic powder, and onion powder. Make sure your kale leaves are mostly dry and lay out on the baking sheet. Drizzle some olive oil on top of the kale leaves, making sure its evenly distributed. Add another dusting of seasoning. Pop in the oven and bake for about 15-20 minutes, or until crisp. If you like more of a kick, I recommend adding some old bay seasoning.

Crunch away!

Friday, June 21, 2013

Cookie Dough Greek Yogurt


I am a sucker for cookie dough. It is impossible for me to resist licking a spoon (or three) while baking cookies. Honestly, I prefer cookie dough to the finished product. This is why I love my cookie dough greek yogurt. It tastes like dessert but is actually a healthy meal for only 200 calories!

You'll need:
1 container of fat free greek yogurt
1 teaspoon of reduced fat peanut butter
1 packet of sweetner (I prefer truvia)
1/2 teaspoon of vanilla extract
pinch of sea salt
1 teaspoon mini chocolate chips

Mix all your ingredients together and enjoy a great tasting "dessert" that won't leave you feeling guility.

Wednesday, June 19, 2013

Low-Carb Zucchini Lasagna


So after my previous experimentation with Spaghetti Squash (see my Spaghetti Squash recipe here) I was ready to try another attempt at replacing pasta with vegetables. For me, the combination of carbs, tomato sauce, and cheese can do no wrong. There's something comforting and home-y about the beloved combination. Lasagna fits this category perfectly but it is a dish I usually stay away from due to its high calorie content. Therefore when my friends and I decided to cook our annual "Pinterest Dinner" I jumped at the chance to make zucchini lasagna.

This zucchini lasagna is completely pasta-free. The trick is to subsititue your pasta sheets with thinly sliced layers of zucchini. This lasanga is also vegetarian, but feel free to add ground beef or turkey if you prefer.

Ingredients:
1 jar of tomato sauce
3 medium zucchini, sliced 1/8" thick
15 oz fat free ricotta
16 oz low fat mozzarella cheese
1/4 cup Parmegiano Reggiano
1 large egg
1 cup of broccoli
2 cups of spinach

How to:
Preheat your oven to 350 degrees. Using a mandelin, thinly slice your zucchini so that they look like wide, thin noodles. Mix together your cheese, egg, brocoli, and spinach. In a 9x12 pirex dish layer your sheets of zucchini, tomato sauce, and cheese mixture until the pirex is filled.


Once fully layered, cook the lasagna covered for 30 minutes, then contine to cook it uncovered for about 15 more minutes. The result should be a delicious, healthy lasagna that can satisfy even the worst cravings for comfort food! 


Friday, June 14, 2013

Italian Style Spaghetti Squash


I have been meaning to try spaghetti squash for a while now. The new health craze caught my attention because I am a huge pasta lover and any way to make a healthier "pasta" dish has my attention. Sadly I don't think I will be able to replace my favored angel hair with spaghetti squash in the future. True the strands do look like spaghetti but overall the dish tasted like grated vegetables. I would be inclined to make it as a side dish in the future, for I found the taste to be rather repetitive as a main course.

Spaghetti squash is a great dish to make as a main meal or a side dish if your looking to lose weight. 40 calories a cup compared to the 200 calories in a cup of pasta is hard to beat. Try it and form your own opinion, for you have nothing to lose (but your waistline!)


Ingrediants:
1 (1 1/2 lb) squaghetti squash
olive oil
1/4 onion, chopped
2 cloves of garlic, chopped
tomato sauce
capers (optional)
freshly grated parmesean cheese

How To:
Preheat the oven to 350 degrees. Cut your spaghetti squash in half lenghtwise. Remove the seeds. Cook the squash on a baking sheet until soft, approvimately 1 hour. Let the squash cool slightly and srape out the inside of the squash with a fork to remove the spaghetti-like strands.

In a pan saute the onion and garlic with the olive oil until lightly browned. Add the spaghetti squash and throughouly mix so the squash absorbs the flavor. Then add your favored tomato sauce and capers. Mix the "pasta" thoughouly. Add fresh parmesean cheese for flavor. Buon appetito!

Wednesday, September 5, 2012

Vegetable Lasagna


It feels good to be back! These past couple of weeks I've been so overwhelmingly busy with moving back to school and getting settled with a routine. Since classes officially started yesterday it seems I'll have some semblance of a schedule now! Being a junior on campus now means that I've graduated dorm life, moved past the sorority house, and am now officially living on my own (well plus 4 other girls) in a house. Since I won't have access to the dining hall and my meals are no longer catered to me, I knew before going away that I would have to master some of my favorite recipes and create some new ones.

I absolutely love Italian food. Anything with tomato sauce and cheese I instantly adore. Though I knew back at school that I couldn't get away with making myself pizza and baked ziti every single night. So I tried to come up with a new recipe that would allow me to get my fix without the guilt. Introducing Veggie Lasagna. This dish is vegetarian and gluten free and can be used as a meal or simply a side dish. It is so easy to prepare and is so incredibly healthy.

You'll need:
Any mix of vegetables you like. I used:
Cauliflower
Broccoli
Zucchini
Squash
Brussel Sprouts
Onion
Tomato Sauce
Mozzarella Cheese
Olive Oil
Seasoning (sea salt, pepper, garlic powder, italian seasoning)

How to:
Wash, cut, and clean all the vegetables properly. Next spread them out on baking sheets and mix the veggies with a nice coating of olive oil, salt, pepper, and some garlic powder.

Cook all the vegetables on 350 until they start to tenderize. I finished my vegetables off with a broil for about 2-3 minutes so they have a bit of a crunch. When they're all cooked, mix them all into a baking pan with the tomato sauce and any extra seasoning you feel is needed.


 Lay the mozzarella on top and let it cook on a low heat until the mozzarella is fully melted.


 Bon Appétit!


Friday, August 17, 2012

Ooey Gooey Peanut Butter Cookies


Anything peanut butter related is often a hit in my family and its been hard trying to find the perfect peanut butter dessert. Often I find them too heavy that I'm craving a gallon of milk afterwards. This recipe gives you the perfect peanut butter cookie that wont leave your mouth glued shut afterwards! And they are so easy to make, it only requires 4 ingredients and they also happen to be gluten free!

You'll need:
1 cup of peanut butter (crunchy or smooth, you're preference!)
1 cup of sugar
1 egg
1 tablespoon of baking soda

How to:

Combine all the ingredients in a bowl and mix together. Form balls of dough and place them on a greased cookie sheet. These cookies do not flatten out well in the oven so make sure to press them down on the sheet before cooking. Then just pop them in the oven at 350 for 6-8 minutes. I warn you, these cookies expand like crazy so make sure you place them far apart on the baking sheet because I almost ended up with a peanut butter cookie cake instead!


Tuesday, August 14, 2012

French Macaroons


I've always had a sweet tooth for desserts, and have never been afraid to tackle a new recipe, but I've always been hesitant towards the french macaroon. They have to be made to perfection in order to avoid any cracks, flattening, or a hollow shell. Even in the recipe it warns agains making them in humid temperatures since these treats are so finicky! Macaroons are a special treat in my family being that they are my sister's favorite dessert and are naturally gluten free. They came out so good that I had to make 2 batches in 2 days to keep up with the demand! The best compliment was when I shared some with my friend who just returned from Paris and compared them from the famous macaroon shop Ladurée! These desserts are so gourmet and adorably petite that you will impress anyone you share these treats with.

You'll need:
2 large egg whites at room temperature
1 cup confectioners sugar
1/4 cup of superfine sugar
3/4 cup almond flour
pinch of cream of tartar
piping bag
parchment paper

How to:
Sift together the almond flour and confectioners sugar twice to make sure its superfine. Preheat your oven to 375. Whisk the egg whites on medium speed until foamy. Add the cream of tartar and whisk until soft peaks form. Reduce the mixing speed to low and add the superfine sugar. Increase the speed to high and whisk until stiff peaks form (approximately 8 minutes). Add the flour mixture to the whites and fold in until the mixture is shiny and smooth. *tip* if you like the flavor of almonds add a splash of almond extract to your batter to really bring out the almond flavor in the batter!

Transfer the batter to a pastry bag and pipe out 3/4 inch circles about an inch apart on a baking sheet (make sure you line your baking sheet with parchment paper otherwise your macaroons will stick!) When finished tap the bottom of the baking sheet to release trapped air. Reduce the oven temperature to 325 degrees and bake the macaroons for 10 minutes, rotating the tray halfway through.


Sandwich 2 same-size macaroons with 1 teaspoon of filling. I used raspberry jam which added a nice contrast to the almond crusts.


Monday, August 13, 2012

Petite Apple Pies


Sorry for the delay in posts, this weekend has been crazy with ending my last week of work and getting in the mindset for back to school. To de-stress I went into a baking frenzy whipping up all sorts of treats. There was a dessert on pinterest that caught my eye that I was dying to replicate and its the perfect fall dessert. Its a pie crusted apple-stuffed apple. Sounds impressive, right? I first started out by making my own homemade gluten free pie crust (I just substituted gluten free flour) in my pie crust recipe, but you can just use store bought to make things easier.

You'll need:
6 apples
1/2 cup of sugar (I used nustavia for a healthier version)
1 tablespoon of brown sugar
1 tablespoon of cinnamon
pie crust
melon ball scooper
apple peeler

How to:

Cut the top off of 4 apples and scoop out the insides with a melon ball scooper. Be careful not to pierce the skin of the apple!
The hollowed apples
Next peel the skins off the 2 extra apples. When all peeled chop up the apples into small pieces. In a large bowl combine the sugar, cinnamon, and brown sugar. Add the apples and mix until all the apple pieces are covered in the sugared mixture. Scoop the apple mixture into your hollowed out apples

Fill your apple shell to the brim, but not so that its overflowing
Finally cut your pie crust into 1/4 inch strips and lattice over the apples. Place the finished apples in a glass pan and fill with just enough water to cover the bottom of the apples. Cover with foil and bake for 20-25 minutes on 350. I put my oven on broil (425) for the last minute or two to get that gorgeous brown colored crust. Enjoy and happy fall feasting!


Add some powdered sugar for some extra sweetness!

Tuesday, August 7, 2012

Low-cal Ready to Eat Cookie Dough


The only thing better than chocolate chip cookies is chocolate chip cookie dough! But knowing that the cookie dough will end up surrounding my tummy instead of in it, has deterred me from scarfing a whole bowl of the gooey stuff everytime I whip up a batch. I've come across a single serve recipe for ready to eat cookie dough that will save you from any food poisoning (bye-bye salmonella) and tweaked it into a low-cal version that is the perfect guilt free dessert!

You'll need:
1.5 tablespoons of butter (I used Smart Balance)
3 tablespoons of flour (I used Bob's Red Mill Gluten Free Flour)
1 tablespoon milk (skim)
2 tablespoons of sugar (I used Splenda because it has a fine texture that blends well into the dough)
splash of vanilla extract
chocolate chips or carob chips (or andy topping of your choice!)

How to:

Mash the butter. Then add all other ingredients excpet for the milk and additional toppings to end up with a dry, crummy mixture. Then add the milk and toppings and enjoy!

The dough makes about 4 balls and totals to 100 calories before adding toppings

(with 2 tablespoons of carob chips or 1 tablespoon of regular semisweet chocolate chips the total is 170 calories)

Monday, July 30, 2012

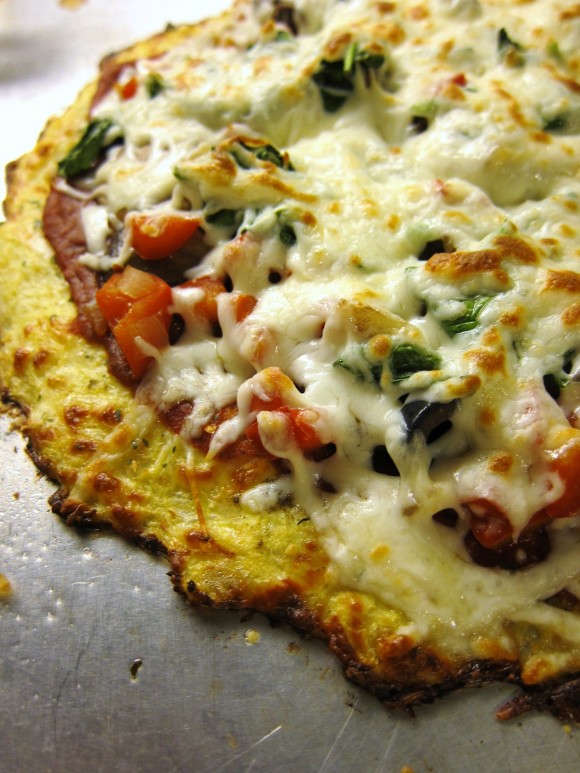
Cauliflower Crust Pizza


I am a huge foodie and I absolutely love Italian food! But since discovering I was gluten intolerant this past year, the way I've done Italian has slightly changed. Pizza is one of my all time favorite foods and I think it's just the quintessential comfort food. I've noticed a lot of hype about these new healthier versions of pizza that are gluten free. The secret? Cauliflower! I was skeptical at first because how can a pizza made out of vegetables be as satisfying as the real thing? But I was pleasantly surprised after making it for a dinner party with friends. The crust is nice and cripsy and the center is just deliciously gooey. Since making it with my friends this pizza has become a staple for me and since its made mostly from cauliflower there is a lot less fat and calories, making this dinner a non-guilty treat!

You'll need:
1 cup of shredded mozzarella
1 egg
1 cup of finely blended cauliflower
toppings of your choice
(serves 2)

Directions:
Preheat the oven to 450 degrees. Blend the cauliflower until you get it nice and fine. Then microwave the cauliflower for 8 minutes to dry it out. After it lightly cools, add the egg, cheese, and mix. Press the mixture onto an oiled pan or baking sheet making the shape of the pizza. The "dough" will not rise so make sure the pizza is not too thin. Bake for 12-15 minutes. Take out the dough and add your desired toppings and bake for another 3 minutes or until your cheese on top is nicely melted and browned.

Calories for margarita pizza: 298 calories for half

Thursday, July 26, 2012

Summertime Treats


During the summer I always find myself craving a refreshing dessert. A few weekends ago my friends and I stumbled accross this place in New York City called Forbidden Fruit. They had a huge assortment of different fruits that could be dipped in different types of chocolate with various toppings. Since they were so good, I attempted to recreate my own version at home the next night! I used bananas, dark chocolate (its good for your heart!), and some rainbow sprinkles for a fun pop of color!